Processing 笔记本 (2)
from idelem
这次做的是一个调色盘 demo 项目,练手顺便实验颜料混合算法(事实证明符合物理直觉的颜料混合非常复杂)。
涉及到的 Processing 知识:
- 类和对象
- 如何显示对象
- 从文件读取
需求和交互设计(打草稿!)
首先考虑这个调色盘有哪些功能。最初的设想很简单:
- 正方形,划分成 16 格,每格里有颜色或空白
- 左键混色(落笔),右键吸色(蘸取)
- 颜料转移时会被稀释,便于控制添加颜色的量(后来发现很难做,要重构)
程序框架
决定了功能需求后,整个程序的框架也就呼之欲出了:
import java.util.*;
import java.text.*;

// 记录当前颜色和透明度的全局变量
color brush_color = color(0, 0, 0);
float brush_alpha = 0.0;
// TODO  我们还需要定义一个 Paint 类来储存和显示颜料,过会儿再说
// Paint[] palette = new Paint [16];

// 这是启动时执行的函数,用于初始化一些数据
void setup() {
  // 分辨率 256*256,每格宽高 64
  size(256, 256);
  // TODO 在这里初始化和显示所有颜料
}

// 每帧更新画布的函数
void draw() {
  // TODO 每帧画背景和颜料
}

// 每次鼠标点击后都会触发的函数
void mousePressed(){
  if (mouseButton == LEFT) {
    // 点击左键混色
  }
  else if (mouseButton == RIGHT) {
    // 点击右键取色
  }
}
这里还需要解决一个问题:如何确定鼠标点击时选择了哪格颜色?由于颜色平铺在 4x4 的方格里,可以写一个 get_color_index(int mouseX, int mouseY) 函数,传入点击的屏幕坐标,返回颜色序号(0-15):
int get_color_index(int x, int y) {
  int row = y / 64;
  int col = x / 64;
  return row * 4 + col;
}
Paint 类
接下来要给颜料写一个类,设计如下。
属性(要给每格颜料存储的数据):
- 当前颜色
- 当前透明度
- 所在的格子编号(用于绘制该对象)
方法(每格颜料可以进行的操作):
- 混色(改变当前颜色)
- 吸色
public class Paint {
  // 颜料对象的属性
  color paint_color = color(0,0,0);
  float paint_alpha = 0.0;
  int index = 0;

  // 构造方法,用于初始化
  Paint(color c, float a, int i) {
    // ...
  }

  void mix() {
    // 混色
  }

  void pick() {
    // 取色
  }

  // 用于在屏幕上绘制该颜色
  void display() {
    // ...
  }
}
从文件加载色板
Processing 支持从 sketch 项目文件夹读取文本、图像等文件,所以我打算让它从外部批量读取色板,方便修改。
txt 文件格式如下,每行一个颜色,用空格分隔 rgb:
255 0 0
0 255 0
0 0 255
本来还想自定义透明度,但感觉没必要,就默认为 1.0 了。需要的话可以参考读取浮点数的 API。
至于为什么透明度的范围是 0.0-1.0,这是为了方便 lerp 和做各类曲线变换。
那么加载色板的代码写在 setup() 里:
// 墨和水是两个基础颜料,且需要手动调整透明度,故 hardcode 之
palette[0] = new Paint(color(0,0,0), 1.0, 0);
palette[1] = new Paint(color(255,255,255), 0.0, 1);

// 从 palette.txt 加载,存在一个字符串 array 里
String[] lines = loadStrings("palette.txt");
for (int i = 0; i < min(lines.length, 14); i++) {
  int[] rgb = int(split(lines[i], ' '));
  // 初始化颜色
  palette[i+2] = new Paint(color(rgb[0], rgb[1], rgb[2]), 1.0, i+2);
}

// 初始化剩下的空白格子
for (int i = lines.length; i < 14; i++){
  palette[i+2] = new Paint(color(255,255,255), 0.0, i+2);
}
混色算法分析
真实的颜色(而不是彩色光)混合是这个项目的难点,好在写工具本来就是为了方便实验各种混合算法。有了可交互框架后,先随便写一个 mix 函数看看效果吧。
Additive blending: the naive approach
void mix() {
    paint_color = lerpColor(paint_color, brush_color, 0.5); // 暂且略过透明度计算
    paint_alpha = (brush_alpha + paint_alpha) / 2;
    display();
  }
第一个 mix 函数仅仅是简单地把两个颜色相加后除以 2。之前在 ps 里随便挑了几个颜色,研究结果如下:
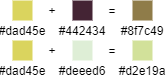
看着效果还不错,然而没有这么简单——事实表明,写测试用例必须考虑极端情况,挑选中庸的例子是没有用的。而在颜色混合领域,一个经典的极端情况就是蓝黄相加。
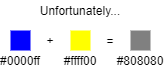
(为什么蓝黄相加格外经典:因为在大部分人的生活经验里,蓝加黄就应该是绿色!相比之下红和天蓝、绿和粉红相加得到灰色,好像就没那么不可接受。)
同理,其他互补色平均下来也是 50% 灰色。这在色光混合时是合理的(此处应有一张配图,内容是旋转一个半蓝半黄的色盘,可以看到结果的确是灰色,但我找不到那张图了),但并不是我想要的效果。
所以实验后发现,如果只给红黄蓝三色,将永远调不出绿色,非常可悲。
Subtractive blending: CMYK
检索相关资料,发现之前的做法有两个问题:1. 应该用减法(乘法?)混合,2. 色彩模型不对,网友纷纷推荐用 CMYK。
RGB 模型的乘法混合(正片叠底)解决了普通补色的混合,但依然无法解决蓝黄问题,它们相乘后会变成 #000000 也就是黑色。这并不是我们想看到的,所以否决。
CMYK 模型的蓝色 #00f 和黄色 #ff0 分别对应 (1, 1, 0, 0) 和 (0, 0, 1, 0),CMYK 的加法运算等于 RGB 的乘法运算,故得到 (1, 1, 1, 0),也是纯黑色。
但在 photoshop 里,不知何故,#00f 和 #ff0 分别对应 (0.93, 0.75, 0, 0) 和 (0.1, 0, 0.83, 0),而结果颜色是 (0.93, 0.75, 0.83),正是一个绿色(不是很绿但也足够绿了)。这是为什么?
搜索一番后,这个答案告诉我:
The whole idea with RGB to CMYK conversion is to create a CMYK image which on print will look as similar as possible to the original RGB image.
A CMYK color is not an objective color, it's simply a set of technical instructions for the printing device on which halftone percentages to use.
也就是说,photoshop 的转换仅仅是为了让打印结果看起来尽可能接近原来的 RGB 图像,和我们要做的空间转换无关(我应该在 RGB 模型的文件里计算 CMYK 颜色混合,而这么做并没有解决蓝黄问题)。
那么,我可不可以也像 photoshop 一样,实现我自己的颜色模拟算法?答案似乎是可以,然而,正如引文所说,一个颜色的 CMYK 表达并不唯一,而和不同的打印机参数有关。我没那个时间研究和寻找一套适合我的色彩参数 (color profile)。所以这个方案也否决了。
至于 photoshop 到底用了什么算法,这个问题太复杂,暂且搁置。
Back to additive: RYB
又检索一番,发现有人提出过基于真实颜料的 RYB 色彩模型:

这个模型完美复刻了红黄蓝混合后获得屎色的现实情况,看起来很有前途。网上流传着两种转换算法,前者要用到三线性插值 trilinear interpolation 和一些魔法数字,把颜色从一个立方体映射到另一个立方体,而且没有从 rgb 转换到 ryb 的方法,遂放弃;后者来自这篇只有一页的论文,实现了对称转换。
第二种算法原理和步骤如下(仅以 RGB to RYB 为例):
- 先把所有的白色抠出来 $rgb_{RYB} –= min(rgb_{RGB})$
- 从红色分量里把黄色抠出来 $r_{RYB} = r_{RGB} – min(r_{RGB}, g_{RGB})$,黄色晾干备用(因为 RGB 的黄色是红绿组成的)
- 从绿色分量里把黄色抠出来,剩下的绿色晾干备用 $g_{RGB} – min(r_{RGB}, g_{RGB})$
- 把这部分多余的绿色和蓝色搓在一起,形成新的蓝色分量 $b_{RYB} = (b_{RGB} + g_{RGB} – min(r_{RGB}, g_{RGB}) / 2$(因为 RGB 的绿色要拆进 RYB 的蓝和黄)
- 把原本的绿色和之前抠出来的黄色搓在一起,形成新的黄色分量 $y_{RYB} = (g_{RGB} + min(r_{RGB}, g_{RGB}) / 2$
- 最后,加回去一个黑色 $rgb_{RYB} += min(1 – rgb_{RGB})$
相关的数学证明就不写了,有兴趣的读者可以推导。代码在文章最后。
透明度混合
(🚧 施工中)
Next
接下来还要优化的功能:
- 记录每一格的颜料量,以此为混色凭据
- 支持从图片读取色板,甚至拖拽入色板(see sDrop, a processing library by andreas schlegel.)
- 保存当前调色盘
全部代码:
import java.util.*;
import java.text.*;

color brush_color = color(0, 0, 0);
float brush_alpha = 0.0;
Paint[] palette = new Paint [16];

void setup() {
  size(256, 256);

  palette[0] = new Paint(color(0,0,0), 1.0, 0);
  palette[1] = new Paint(color(255,255,255), 0.0, 1);

  String[] lines = loadStrings("palette.txt");
  for (int i = 0; i < min(lines.length, 14); i++) {
    int[] rgb = int(split(lines[i], ' '));
    palette[i+2] = new Paint(color(rgb[0], rgb[1], rgb[2]), 1.0, i+2);
  }

  for (int i = lines.length; i < 14; i++){
    palette[i+2] = new Paint(color(255,255,255), 0.0, i+2);
  }
}

void draw() {
  background(128);
  for (int i=0; i < palette.length; i++) {
    palette[i].display();
  }
}

void mousePressed(){
  int idx = get_color_index(mouseX, mouseY);
  if (mouseButton == LEFT) {
    palette[idx].mix();
  }
  else if (mouseButton == RIGHT) {
    palette[idx].pick();
  }
}

int get_color_index(int x, int y) {
  int row = y / 64;
  int col = x / 64;
  return row * 4 + col;
}

public class Paint {
  color paint_color = color(0,0,0);
  float paint_alpha = 0.0;
  int index = 0;

  Paint(color c, float a, int i) {
    paint_color = c;
    paint_alpha = a;
    index = i;
  }

  void mix() {
    float weight = constrain(brush_alpha / (paint_alpha + brush_alpha), 0.0, 1.0);
    paint_color = lerpColor(paint_color, brush_color, weight);
    paint_alpha = (weight + paint_alpha) / 2;
    display();
  }

  void pick() {
    brush_color = paint_color;
    brush_alpha = paint_alpha;
  }

  void display() {
    noStroke();
    fill(paint_color, paint_alpha * 255);
    rect(index % 4 * 64, index / 4 * 64, 64, 64);
  }
}
进阶版补丁(RYB 混合版本):
color mixRYB(color c1, color c2, float w) {
    color c1RYB = RGB2RYB(c1);
    color c2RYB = RGB2RYB(c2);
    color cRYB = lerpColor(c1RYB, c2RYB, w);
    color c = RYB2RGB(cRYB);
    return c;
  }

// algorithm: http://nishitalab.org/user/UEI/publication/Sugita_SIG2015.pdf
// code: http://www.deathbysoftware.com/colors/index.html

  color RGB2RYB(color rgb){
    float r = red(rgb);
    float g = green(rgb);
    float b = blue(rgb);
    float w = min(r,g,b);
    r -= w;
    g -= w;
    b -= w;
    float maxg = max(r,g,b);
    float y = min(r,g);
    r -= y;
    g -= y;
    if (b > 0 && g > 0) {
      b /= 2;
      g /= 2;
    }
    y += g;
    b += g;
    float maxy = max(r,y,b);
    if (maxy > 0) {
      float n = maxg / maxy;
      r *= n;
      y *= n;
      b *= n;
    }
    color ryb = color(r+w, y+w, b+w);
    return ryb;
  }

  color RYB2RGB(color ryb){
    float r = red(ryb);
    float y = green(ryb);
    float b = blue(ryb);
    float w = min(r,y,b);
    r -= w;
    y -= w;
    b -= w;
    float maxy = max(r,y,b);
    float g = min(y,b);
    y -= g;
    b -= g;
    if (b > 0 && g > 0) {
      b *= 2;
      g *= 2;
    }
    r += y;
    g += y;
    float maxg = max(r,g,b);
    if (maxg > 0) {
      float n = maxy / maxg;
      r *= n;
      g *= n;
      b *= n;
    }
    color rgb = color(r+w, g+w, b+w);
    return rgb;
  }